Instagram Feeds
Precrafted Support
Some of our themes include an Instagram feed feature, allowing you to show your latest Instagram photos directly on your blog. To do this, you’ll need to authorize the theme to get your photos from Instagram.
Note: Instagram recently made some changes (June 1st 2016) to their system which make it more complex to set up a feed like this, so apologies in advance for this getting a bit technical!
Here’s how to do it:
1. Log in to your Instagram account
Click here and log in to your Instagram account. Already logged in? Skip to step 2!
2. Set up a ‘client’
Click here to go to the Instagram Developers page, and click the Register a New Clientbutton in the top right corner.

You’ll get a form to fill out. Enter your site/blog’s name in the Application Name, Description, and Company name fields.
In the Website URL, Valid redirect URIs, and Privacy Policy URL fields, enter your Tumblr website URL.
Enter your email in the Contact email field. Fill out the Captcha and hit the Register button.
3. Adjust your settings and find your Client ID
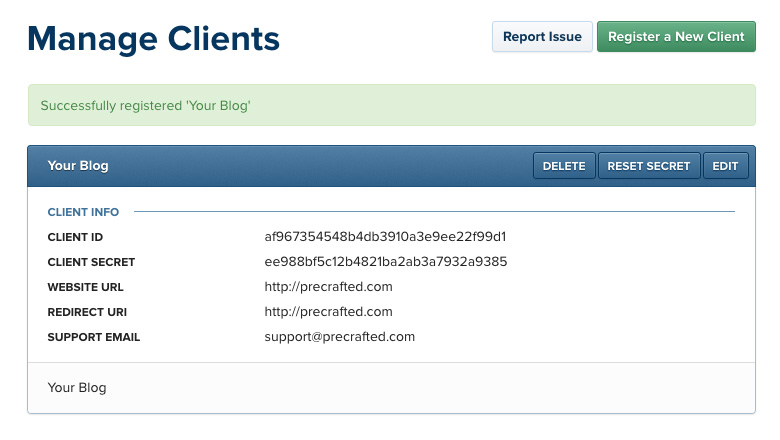
Once you’ve registered your client, you should see a message at the top of the screen – “Successfully registered ‘Your Site Name’” – and below that some details of your client, like this:
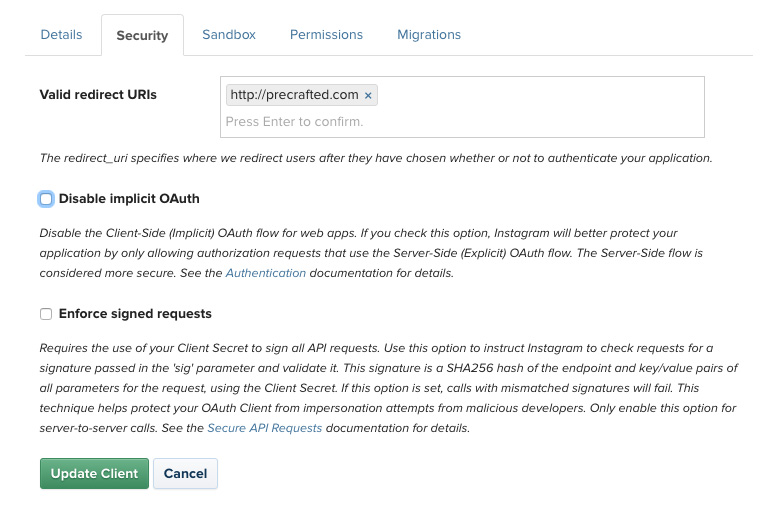
Hit the Edit button inside the blue bar – you need to tweak a few of the settings here. The Details tab is what you just entered – that’s all good. Click the Security tab and then un-check the Disable implicit OAuth. Then hit the Update Client button to save your changes. It should look like this:
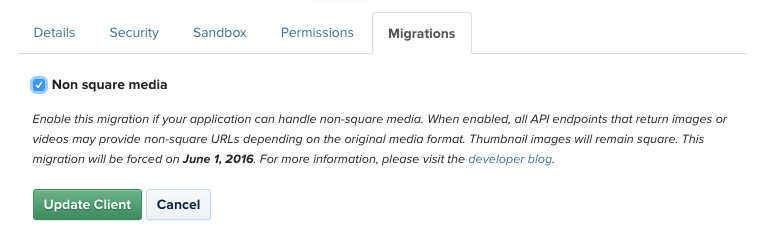
All good? Good! Go back into the Edit screen, and then click to the Migrations tab. Make sure that the Non square media option is enabled and then click the Update Client button. It should look like this:
Great! That’s all the options done. If you don’t see the Migrations tab or the Non square media option, don’t worry – Instagram are removing this after June 1st 2016. Now, copy the Client ID code under the blue Client Info heading – you’ll need this in the next step.
4. Get your Access Token
Next you need to get your Access Token, which allows your Instagram images to be shown by the theme. To do this, you need to paste a specific URL into your web browser:
https://api.instagram.com/oauth/authorize/?client_id=CLIENT-ID&redirect_uri=REDIRECT-URI&response_type=token
You’ll need to replace the CLIENT-ID with the Client ID code you copied before, and the REDIRECT-URI with your Tumblr website URL. It must be the same address you added to the client settings in step 2, otherwise it won’t work.
So for example, if your Client ID was 123456789 and your Tumblr URL was http://precrafted.tumblr.com, then the URL you need to use is:
https://api.instagram.com/oauth/authorize/?client_id=123456789&redirect_uri=http://precrafted.tumblr.com&response_type=token
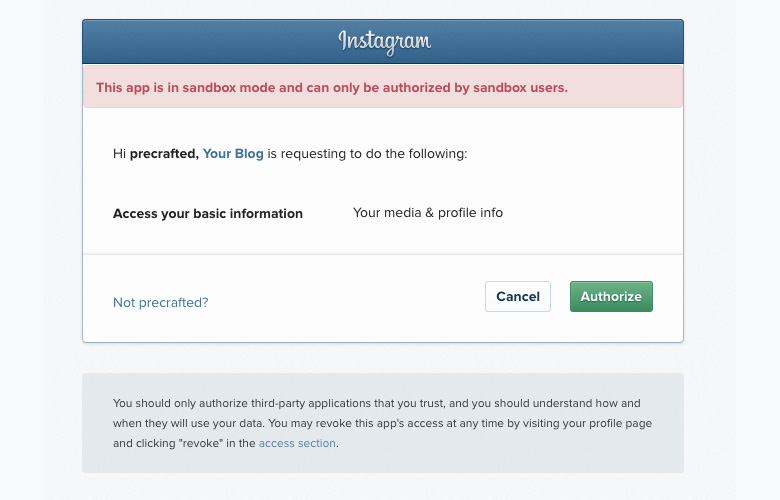
Visiting this URL will take you to an authorization page on your Instagram account – click the Authorize button to give it access to your photos:
Once that’s done you’ll go to your Tumblr website, but there will be a code at the end of the URL in the browser’s address bar, like this:

The part after the = symbol is your Access Token. Copy this, and paste it into the Instagram Token setting on your Tumblr’s Edit Theme page.
5. Celebrate
You made it this far? Congratulations! We hope Instagram will make it easier to do this in the future, but until then we have to use this method. Thanks for sticking with it!